Homemade Bagels
These homemade bagels are so simple to make and are sure to be a hit with the whole family. Chewy on the outside, perfectly dense and flavorful on the inside, make them just once and you will never buy store-bought again!
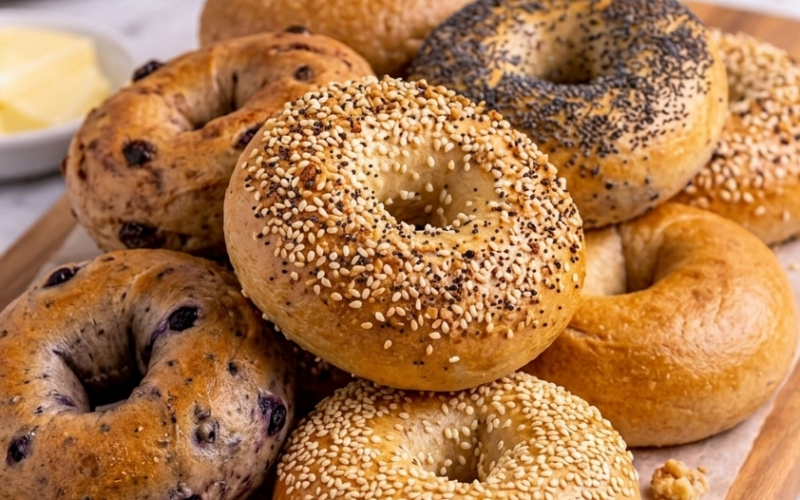
Perfectly chewy, golden, and full of flavor—these bakery-style bagels are easier than you think.
If you’ve only ever had store-bought bagels, you’re in for a game-changer. These homemade bagels are chewy on the inside, crisp on the outside, and packed with flavor. No fancy equipment, no hard-to-find ingredients—just good dough, a quick boil, and a golden bake. Customize with your favorite toppings, and enjoy them fresh, warm, and infinitely better than anything in a plastic bag.
Weekend brunch? Weekday breakfast? Midnight snack? These bagels rise to the occasion.
“I made these on a lazy Sunday and now it’s our holiday tradition. Nothing beats a fresh, warm bagel right out of the oven!”
Why You’ll Love It
- Chewy & Golden: Classic bagel texture with a crisp crust.
- Totally Customizable: Sweet, savory, seeded, or plain—you do you.
- No Fancy Tools: If you’ve got a pot and a baking sheet, you’re set.
- Better Than Store-Bought: Seriously. Once you taste them fresh, there’s no going back.
Ingredients & Substitutions
| Ingredient | Why It Matters | Notes / Swaps |
|---|---|---|
| Bread Flour | Essential for chew | All-purpose flour works but with less chew |
| Molasses | Adds subtle sweetness & feeds the yeast | Swap with honey or brown sugar if needed |
| Active Dry Yeast | Leavens and builds flavor | Instant yeast is fine—just skip blooming |
| Salt | Balances sweetness and deepens flavor | Don’t leave it out—it’s key |
| Warm Water | Activates the yeast and hydrates the dough | Aim for 100–110°F (38–43°C) |
| Baking Soda + Molasses | For that shiny, chewy crust post-boil | Classic combo—no real substitute |
| Optional Toppings | Flavor and texture on top | Use sesame, poppy, Everything Seasoning, or cheese |
The Beauty of a Bagel Boil
Before baking, the shaped dough gets a quick dip in a simmering bath with baking soda and molasses. This classic step is what gives bagels their distinctive chew and glossy crust—don’t skip it! It’s easy and makes all the difference.
Flavor Ideas (Minimal Effort, Maximum Payoff)
- Cinnamon Raisin: Mix into the dough before shaping.
- Cheddar Jalapeño: Add toppings after boiling for a savory twist.
- Sweet Glaze: Brush warm bagels with honey or maple syrup.
- Mini Pizza Bagels: Toast and top with sauce, cheese, and your faves.
Frequently Asked Questions (FAQ)
Can I make the dough ahead of time?
Yes! After the first rise, refrigerate overnight. It’ll be easier to shape and taste even better.
Why boil the bagels before baking?
Boiling sets the crust, giving you that chewy, shiny exterior. It’s what makes a bagel… a bagel.
Can I freeze them?
Absolutely. Freeze after baking. Reheat in a toaster or oven for fresh-bagel vibes anytime.
What toppings work best?
Sesame, poppy seeds, Everything Seasoning, shredded cheese, or cinnamon sugar—whatever you love.
My dough didn’t rise. What happened?
Check your yeast—is it expired? Also, make sure your water wasn’t too hot (kills yeast) or too cold (doesn’t activate).
Homemade Bagels
Prep Time: 1 hour
Cook Time: 15 minutes
Total Time: 1 hour 15 minutes
Servings: 8 large bagels or 12 mini bagels
Equipment
Mixing Bowl
Stand Mixer
Baking Sheet
Measuring Cups and Spoons
Bench Scraper
Large, Wide Pot
Slotted Spoon
Parchment Paper
Ingredients
4 cups (480g) Bread Flour, plus extra for dusting
1 tablespoon (12g) Granulated Sugar
2 teaspoons (10g) Molasses
2 ¼ teaspoons (7g) Active Dry Yeast
2 teaspoons (12g) Salt
1 ½ (330 mL) cups Warm Water
3 quarts (about 3 liters) Water
1 tablespoon (36g) Molasses
1 tablespoon (15g) Baking Soda
Directions
Step 1: Activate the Yeast
- – In a small bowl, combine the warm water, granulated sugar, and molasses.
- – Sprinkle the active dry yeast over the mixture and stir gently to combine.
- – Let the yeast mixture sit for about 5 minutes, or until it becomes frothy and bubbly.
Step 2: Prepare the Dough
- – In a large mixing bowl or stand mixer bowl, combine the bread flour and salt.
- – Add the activated yeast mixture to the flour and mix until a dough begins to form.
- – Knead the dough for about 10 minutes using a stand mixer with a dough hook or by hand until it is smooth and elastic.
- – If the dough is too sticky, add more flour, a tablespoon at a time, until it comes together.
- – Once the dough is smooth, shape it into a ball.
Step 3: Let the Dough Rise
- – Place the dough in a lightly greased bowl and cover with a damp cloth or plastic wrap.
- – Allow it to rise in a warm place for 1 hour, or until it has doubled in size.
Step 4: Shape the Bagels
- – Preheat your oven to 425°F (220°C) and line a baking sheet with parchment paper.
- – Once the dough has risen, punch it down gently to release any air bubbles.
- – Divide the dough into 8 equal portions for large bagels or 12 portions for mini bagels.
- – Roll each portion into a ball and use your thumb to poke a hole through the center, stretching it to form a bagel shape.
- – Place the shaped bagels on the prepared baking sheet and let them rest while you prepare the water bath.
Step 5: Boil the Bagels
- – In a large, wide pot, bring 3 quarts of water to a boil.
- – Add 1 tablespoon molasses and 1 tablespoon baking soda to the water. This helps create the classic bagel texture.
- – Carefully drop the bagels into the boiling water, a few at a time. Boil for about 1-2 minutes on each side.
- – Use a slotted spoon to remove the bagels from the water and place them back on the parchment-lined baking sheet.
Step 6: Bake the Bagels
- – Bake the bagels in the preheated oven for 15 minutes, or until they are golden brown.
- – For extra crispiness, flip the bagels halfway through the baking time.
Step 7: Cool and Serve
- – Remove the bagels from the oven and allow them to cool on a wire rack for a few minutes before serving.
Simple Baker’s Tips
- Weigh Your Ingredients: Precision = perfect texture.
- Let Dough Rest Before Shaping: 5–10 minutes helps it relax.
- Chill for Flavor: An overnight rise in the fridge deepens the flavor.
- Add Toppings Fast: They stick best right after boiling—don’t wait.
Final Thoughts from My Kitchen to Yours 💛
There’s something deeply satisfying about pulling a tray of fresh bagels from your own oven. They’re simple, hearty, and adaptable—everything homemade should be. Once you taste these, they might just become your new weekend ritual.
Remember: baking doesn’t have to be complicated. Just a little time, a bit of patience, and a whole lot of flavor.
