No-Fuss Cheesecake
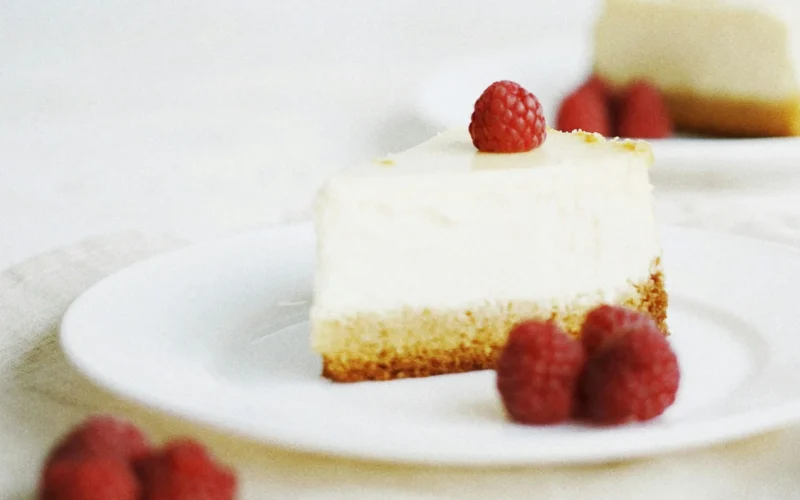
Your no-stress guide to a rich, silky-smooth classic—with zero water bath drama.
If the words “bake a cheesecake” make you break into a nervous sweat, don’t worry—you’re in the right kitchen. This cheesecake is everything you love about the classic: creamy, tangy, rich, and just sweet enough… without any complicated steps. No water bath, no cracks to cry over, no fancy equipment. Good, honest ingredients and a few simple techniques make this recipe feel totally doable—even on a busy day.
Whether you’re baking for a birthday, brunch, or just because it’s Tuesday, this cheesecake brings the wow without the worry.
“Dense, dreamy, and melt-in-your-mouth good. Chill it overnight, and you’ll never go back to store-bought again.”
Why You’ll Love It
- – Smooth & Creamy: The filling is luscious and velvety, like a cheesecake cloud.
- – Sturdy Crust: The buttery graham cracker base holds everything together with just the right crunch.
- – Foolproof Bake: No water bath required—just a little steam and a gentle cool-down.
- – Make-Ahead Friendly: Chill it overnight, and it’s even better the next day.
Ingredients & Substitutions
| INGREDIENT | WHY IT MATTERS | SUBSTITUTIONS/NOTES |
|---|---|---|
| Full-Fat Cream Cheese | The star—rich, thick, and tangy | Avoid low-fat—it won’t set the same |
| Granulated Sugar | Sweetens and balances the tang | Taste and adjust if needed |
| Eggs | Give the cheesecake structure and richness | Room temp is key for even mixing |
| Cornstarch | Helps set without curdling | 2 tbsp flour works in a pinch |
| Heavy Cream | Adds extra creaminess | Half-and-half is okay if needed |
| Vanilla Extract | Adds depth and warmth | Pure is best, but use what you have |
| Graham Cracker Crumbs | For that classic sweet-and-crunchy base | Digestives or vanilla wafers also work |
| Dark Brown Sugar | Adds richness and subtle molasses flavor to the crust | Light brown sugar is a fine substitute |
| Ground Cinnamon | Brings a warm spice to the crust | Optional, but highly recommended |
| Unsalted Butter (melted) | Binds the crust and adds flavor | Salted butter is fine—just skip any added salt |
The Beauty of a No-Water-Bath Cheesecake
Let’s talk real life: water baths are fussy. They leak. They stress you out. And they’re totally unnecessary for this recipe.
Instead, we use a pan of hot water on the bottom rack to create a gentle steam environment—just enough to keep the cheesecake moist without the drama. The result? A creamy, crack-free cheesecake that looks as good as it tastes. No soggy crusts. No foil-wrapping acrobatics. Just chill baking.
Flavor Variations (That Don’t Add Extra Work)
One of the best parts about cheesecake is how versatile it is. You can keep this base recipe exactly the same and give it a little twist with almost zero extra effort:
- – Berry Swirl: Dollop in spoonfuls of raspberry or blueberry jam before baking and swirl with a toothpick.
- – Chocolate Lovers: Stir in ½ cup melted chocolate or swirl Nutella into the top.
- – Lemon Zing: Add 1 tablespoon lemon zest to the batter for a fresh, tangy flavor.
- – Spiced Fall Vibes: Swap vanilla for maple extract and add a pinch of nutmeg and cloves.
Frequently Asked Questions (FAQ)
Can I use low-fat cream cheese?
It’s not recommended. Full-fat cream cheese gives the cheesecake its signature richness and helps it set properly. Low-fat versions often lead to a softer, less stable texture.
Do I really not need a water bath?
Correct! This recipe skips the traditional water bath and instead uses a pan of hot water placed in the oven for gentle steam. You’ll still get a creamy, crack-free cheesecake—without the stress or risk of leaks.
How do I know when my cheesecake is done?
Look for set edges and a slightly jiggly center—like gelatin. It will continue to firm up as it cools and chills. Avoid overbaking, which can cause cracks or a dry texture.
What’s the purpose of the cornstarch?
Cornstarch helps stabilize the filling and prevents curdling, making the texture smoother and more forgiving. You can substitute 2 tablespoons of all-purpose flour if needed.
Can I make it ahead of time?
Definitely—and you should! This cheesecake tastes even better after chilling overnight. It’s the perfect make-ahead dessert for parties, holidays, or casual dinners.
How do I prevent cracks?
Several simple tricks: use room temperature ingredients, don’t overmix the batter, bake gently with steam, and let the cheesecake rest in the oven with the door cracked before cooling. All these steps help avoid temperature shocks and overbaking.
How to Serve (and Impress Without Stress)
This cheesecake holds its own plain—but it also shines with easy toppings:
- – Fresh Berries & Mint—Looks gorgeous, takes 2 minutes.
- – Whipped Cream—A quick swirl from a piping bag (or spoon).
- – Salted Caramel Drizzle—Store-bought or homemade, it’s always a hit.
- – Crushed Cookies or Nuts—Adds texture and a bit of flair.
Hosting? Set out a topping bar so guests can customize their own slice. It’s a small touch that feels fancy and fun.
No-Fuss Cheesecake
Prep Time: 15 minutes
Cook Time: 45 minutes
Total Time: 5 hours – with minimum cooling time
Servings: 12 servings
Equipment
Springform Pan
Hand or Stand Mixer
Food Processor
Round Pan
Measuring Cups and Spoons or Scale
Ingredients
32 oz Full Fat Cream Cheese
1 ½ Cups (300g) Granulated Sugar
4 Whole Eggs
¼ Cup (30g) Cornstarch
½ Cup (120mL) Heavy Cream
2 Teaspoons (10mL) Vanilla Extract
2 Cups (200g) Graham Cracker Crumbs
¼ Cup (50g) Dark Brown Sugar
1 ½ (4g) Teaspoons Ground Cinnamon
¼ Cup (50g) Unsalted Butter, melted
Directions
Step 1: Prepare the Crust
- – Preheat your oven to 325°F (163°C).
- – In a food processor, pulse graham crackers into fine crumbs.
- – In a medium bowl, combine graham cracker crumbs, dark brown sugar, and ground cinnamon.
- – Add melted butter and mix until the mixture resembles wet sand.
- – Press the mixture firmly into the bottom of a springform pan to form an even crust.
- – Bake for 8-10 minutes, then remove and let it cool while preparing the filling.
Step 2: Make the Cheesecake Filling
- – In a large mixing bowl, beat the softened cream cheese until smooth and creamy.
- – Add granulated sugar and continue beating until fully combined.
- – Mix in the eggs one at a time, ensuring each is fully incorporated before adding the next.
- – Add cornstarch, heavy cream, and vanilla extract. Mix until smooth and well combined, but do not overmix.
Step 3: Bake the Cheesecake
- – Pour the cheesecake batter over the cooled crust, spreading it evenly.
- – Place a round pan filled with hot water on the lower rack of your oven (this helps prevent cracking).
- – Bake at 325°F (163°C) for 45 minutes, or until the center is slightly jiggly but set around the edges.
- – Turn off the oven and let the cheesecake rest inside for 10 minutes with the door slightly open.
- – Remove the cheesecake and let it cool completely at room temperature.
Step 4: Chill and Serve
- – Once cooled, refrigerate the cheesecake for at least 4 hours or overnight for best results.
- – Carefully remove from the springform pan before slicing.
- – Serve as is or with your favorite toppings, such as fresh fruit, whipped cream, or caramel sauce.
Simple Baker’s Tips
- – Room Temp Everything: Cold ingredients = lumpy batter. Let them warm up for a silky-smooth filling.
- – Don’t Skip the Oven Rest: That 10-minute crack-the-door moment helps prevent cracking.
- – Want to Dress It Up? Swirl in jam, lemon curd, or chocolate before baking.
- – Make it Ahead: Cheesecake gets better after a chill—perfect for stress-free entertaining.
- – Storage: Keeps well in the fridge for up to 5 days. You can also freeze individual slices.
Final Thoughts from My Kitchen to Yours 💛
Cheesecake can feel like a big-deal bake, but with the right recipe and a calm approach, it becomes something special and simple. I’ve made this for holidays, potlucks, and “just because” Saturdays—and it never fails.
Remember: baking is allowed to be easy. You don’t need to hustle to impress. You just need a recipe that works, a little patience, and a fridge to chill it all down. This one’s got you covered.