Rocky Road Fudge

Your shortcut to rich, chocolatey bliss—no thermometers, no stress, just sweet satisfaction.
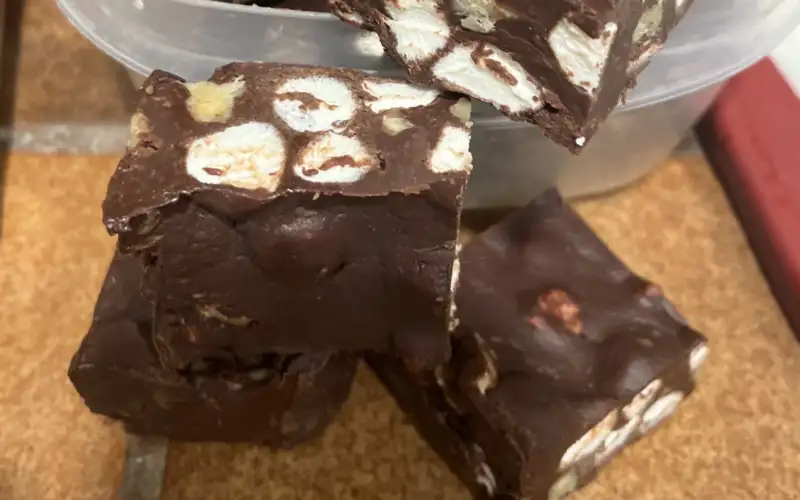
If fudge makes you think of complicated candy-making or sticky sugar thermometers, take a breath—you’re in the right kitchen. This Rocky Road Fudge is everything you want in a treat: gooey marshmallows, crunchy nuts, and smooth, melt-in-your-mouth chocolate… and it takes less than an hour, start to finish.
Whether you’re gifting it, serving it, or sneaking a square from the fridge after midnight, this is fudge that never fails to hit the sweet spot.
“I brought this to a holiday potluck once—and they were the first thing gone!”
Why You’ll Love It
Ultra-Easy: No boiling, no candy thermometer—just melt, mix, chill.
Perfect Texture: Creamy, gooey, crunchy—all in one bite.
Crowd-Pleaser: Nostalgic, festive, and always gone first.
Make-Ahead Friendly: Chill it now, serve it later (or freeze it for later-later).
Ingredients & Substitutions
| INGREDIENT | WHY IT MATTERS | NOTES / SWAPS |
|---|---|---|
| Chocolate Chips or Bars | Base of the fudge—rich, smooth, and decadent | Semi-sweet, bittersweet, or dark work best—avoid milk |
| Sweetened Condensed Milk | Creamy texture and essential sweetness | Must-have—can’t swap it out |
| Vanilla Extract | Enhances and deepens the chocolate flavor | Optional but worth it |
| Mini Marshmallows | Add gooey, fluffy pockets throughout | Full-size marshmallows work if chopped |
| Salted Peanuts | Crunchy, salty contrast to the sweet fudge | Any nut works—try pecans, walnuts, or toasted almonds |
The Beauty of No-Fail Fudge
Let’s be honest: candy thermometers can be intimidating. With this recipe, you don’t need one. Everything melts gently in the microwave (or on the stovetop), and it sets perfectly in the fridge.
It’s the kind of recipe you can make while chatting on the phone or baking with kids. Minimal cleanup, max flavor.
Flavor Variations (Minimal Effort, Major Fun)
Customize this fudge with a simple swap or stir-in:
- S’mores Fudge: Swap peanuts for crushed graham crackers
- Peanut Butter Swirl: Swirl ¼ cup peanut butter into the top before chilling
- Holiday Twist: Use red and green mini marshmallows or crushed peppermint
- Nut-Free Option: Leave out the nuts and add pretzel bits or crispy rice cereal
Frequently Asked Questions (FAQ)
Can I use milk chocolate instead of dark or semi-sweet?
It’s not ideal—milk chocolate is softer and may not set as well. If you do use it, mix with some bittersweet to firm things up.
Can I skip the nuts or marshmallows?
Yes! You can leave them out or replace them with other mix-ins like dried fruit, crushed cookies, or cereal.
How long does it take to set?
Chilling for 2–3 hours in the fridge is usually enough. For best texture, give it a full overnight rest if you can wait.
Can I make this ahead?
Absolutely. Fudge stores beautifully in the fridge for up to a week—or freeze it for up to a month.
What’s the best way to cut clean squares?
Use a sharp knife and wipe it clean between cuts. Let the fudge sit at room temp for 5–10 minutes if it’s too firm.
How to Serve (and Share with Style)
Rocky Road Fudge is great straight from the fridge, but it also makes a lovely gift or dessert board add-on.
- Wrap in Parchment & Twine: Perfect for edible holiday gifts
- Add to Dessert Platters: Combine with cookies and candies
- Serve in Mini Cups: Great for party bites or potlucks
Rocky Road Fudge
Prep Time: 40 minutes
Cook Time: 5 minutes
Total Time: 45 minutes
Servings: 36 pieces, depending on size cut
Equipment
Mixing Bowl
Silicone Spatula
Can Opener
Baking Pan
Parchment Paper
Ingredients
2 cups (340g) Semi-Sweet, Bittersweet or Dark Chocolate Chips
14 ounces Sweetened Condensed Milk
1 teaspoon Vanilla Extract
2 cups (120g) Miniature Marshmallows
1 cup (220g) Salted Peanuts or nut of choice
Directions
Step 1: Prepare the Baking Pan
- – Line a baking pan (8×8 inches or similar size) with parchment paper, leaving extra paper hanging over the edges for easy removal later. Set aside.
Step 2: Melt the Chocolate and Condensed Milk
- – In a medium mixing bowl, combine the chocolate chips and sweetened condensed milk.
- – Heat the mixture in the microwave in 30-second intervals, stirring after each interval, until the chocolate is completely melted and smooth. This should take about 2-3 minutes in total.
- – Stir in the vanilla extract until fully incorporated.
Step 3: Add the Nuts and Marshmallows
- – Once the chocolate mixture is smooth, gently fold in the miniature marshmallows and salted peanuts (or your choice of nuts) using a silicone spatula.
Step 4: Pour into the Pan
- – Pour the fudge mixture into the prepared baking pan. Spread it out evenly using the spatula.
- – Press the mixture gently into the pan to ensure it’s level and compact.
Step 5: Chill and Set
- – Refrigerate the fudge for at least 2-3 hours, or until fully set and firm.
Step 6: Cut and Serve
- – Once the fudge is set, remove it from the pan using the parchment paper.
- – Cut into 36 pieces (or larger if you prefer) and serve.
Simple Baker’s Tips
Use Good Chocolate: Better chocolate = better fudge. Bars melt more smoothly than chips.
Toast Your Nuts: Adds deep flavor—5–8 minutes at 350°F (175°C).
Move Fast: Once melted, the mixture sets quickly. Have your mix-ins ready to go.
Store Smart: Keep covered in the fridge for up to a week—or freeze for future snacking.
Final Thoughts From My Kitchen to Yours 💛
This fudge is like magic—fast, foolproof, and irresistibly rich. I’ve made it for potlucks, cookie trays, and lazy Sundays when I just needed chocolate… and it never disappoints. It’s proof that delicious doesn’t have to mean difficult.
Whether you’re gifting or indulging, this Rocky Road will lead you to sweet, simple success.


